How to Record Screen on Windows 11
Screen recording helps for many things, be it work presentations or gameplays. Recording your screen can be very effective in many ways as it makes things easier.
If you are a Windows 10 user, you should know that there is a built-in screen recorder. And we also got a guide to the best screen recorder for Windows 10. But nowadays Windows 11 is coming, and you might want to figure out how to record screen on Windows 11.
Considering this, this post is helpful. Here we are going to show you how to record Windows 11 with some of the best free screen recorders for Windows 11.
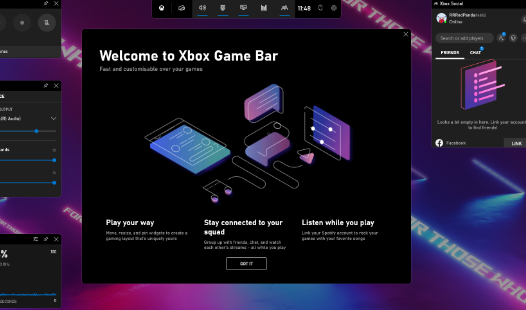
Windows 11 carries over the Xbox Game Bar app as it did in previous versions to let you record seamlessly. This is a Microsoft built-in Windows snipping tool. Although this is an application suitable for games, be aware that you can only film one window at a time. But you can still include your microphone in the recording.
While the app is a bit limited in terms of functionality, the advantage is that you don’t have to install third-party software on your Windows 11. Learn how to use Xbox Game Bar to record screen on Windows 11.
- To get started, search for the “Xbox Game Bar” app or access via the “Windows + G” shortcut on your keyboard.
- Then, via the options offered, click on “Capture”.
- Next, you will open a new capture window. Via this window, click on the “round” icon or the shortcut “Windows + Alt + R” to start recording.
- To stop recording, click on the “Stop” button at the top right of the screen.
- Finally, find the recordings in the “Video capture” folder in the file explorer.
How to record screen on Windows 11 with audio using iTop Screen Recorder
A built-in Windows screen recorder like Game Bar may not offer features like editing tools and a webcam overlay. Xbox Game Bar lacks many crucial aspects and also limits screen recording to a single window. But iTop Screen Recorder is a tool that provides advanced editing tools and webcam features for recordings.
This screen recorder is a fantastic choice for recording Windows 11 tutorials and presentations. It offers full screen recording with webcam. The webcam works as an important feature for people who want to record themselves while gaming or online meetings.
Another thing about the software is that it allows the user to record system sounds or voiceover with a microphone. Screen recording videos often need to be edited. So, this program helps a user to do some basic editing on the recorded videos.
Below are the specific steps of recording Windows 11 screen using EaseUS RecExperts:
Step 1. iTop Screen Recorder . There are two screen recording modes. Choose “Full Screen” , this tool will capture the whole screen; choose “Region” , you will have to manually select the recording area.
Step 2. After that, you can choose to record webcam, system sound or microphone as you want. Of course, you can turn them off if you only need to record the silent screen.
Step 3. Then you can click the red “REC” button to start recording. You will now see a menu bar on your screen. If you want to pause the recording, click on the white “Pause” button; to end the recording, click the red “Stop” button.
Step 4. After registration, you will be taken to the registration list interface. Here you can easily view or edit your recordings.